Eng | 中
FLASHFORGE
  • Home
  • Products
    • Adventurer 3
    • Adventurer 4
    • Creator Pro 2
    • Creator 3 Pro
    • Creator 4
    • Guider IIs
    • Guider 3
    • Guider 3 Plus
    • Foto 9.25
    • Foto 13.3
    • Hunter
    • WaxJet 400
  • Materials
  • Support
  • Blog
  • Contact Us
  • Home
  • Products
    • Adventurer 3
    • Adventurer 4
    • Creator Pro 2
    • Creator 3 Pro
    • Creator 4
    • Guider IIs
    • Guider 3
    • Guider 3 Plus
    • Foto 9.25
    • Foto 13.3
    • Hunter
    • WaxJet 400
  • Materials
  • Support
  • Blog
  • Contact Us

Detailed settings of a treelike support in 3D slicing software 

26/11/2016

 
Picture
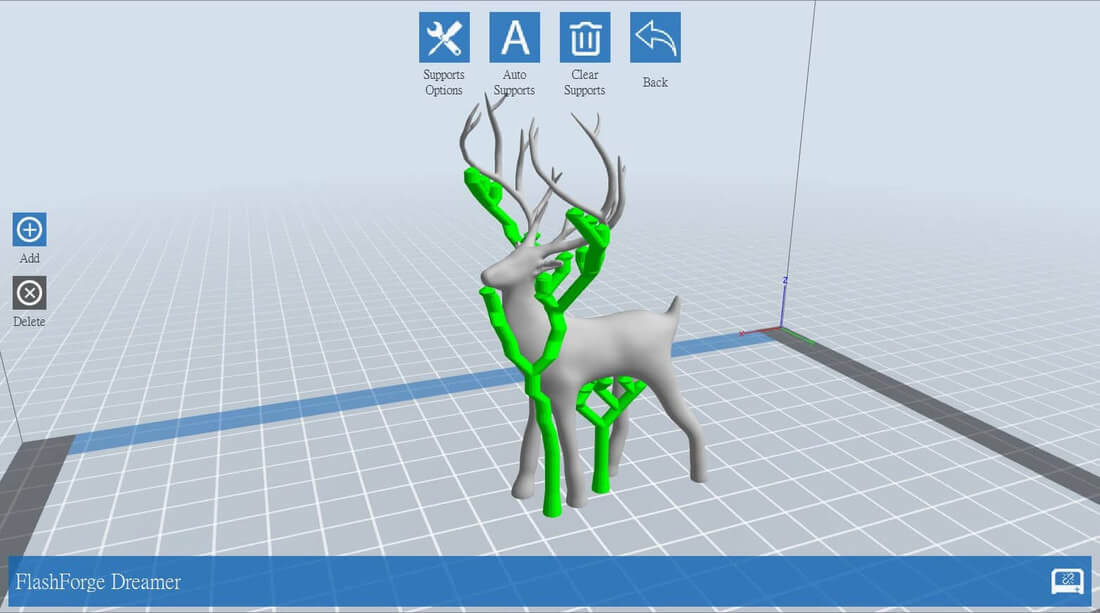
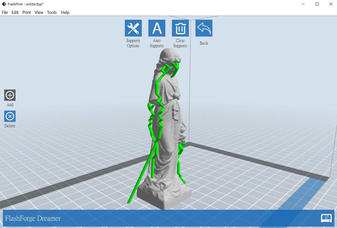
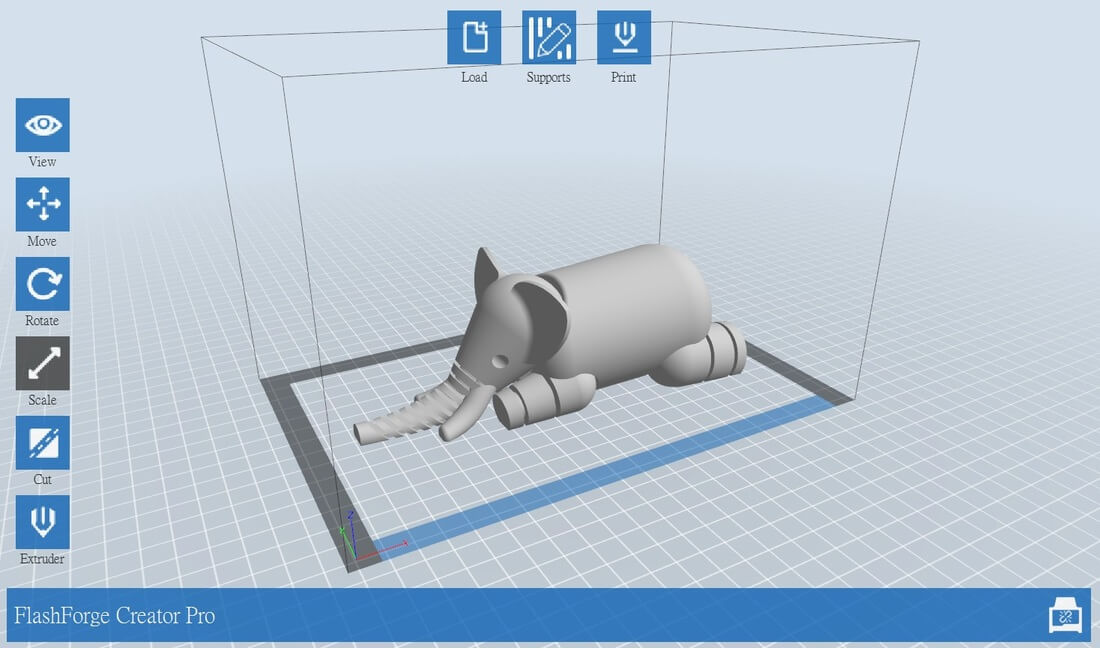
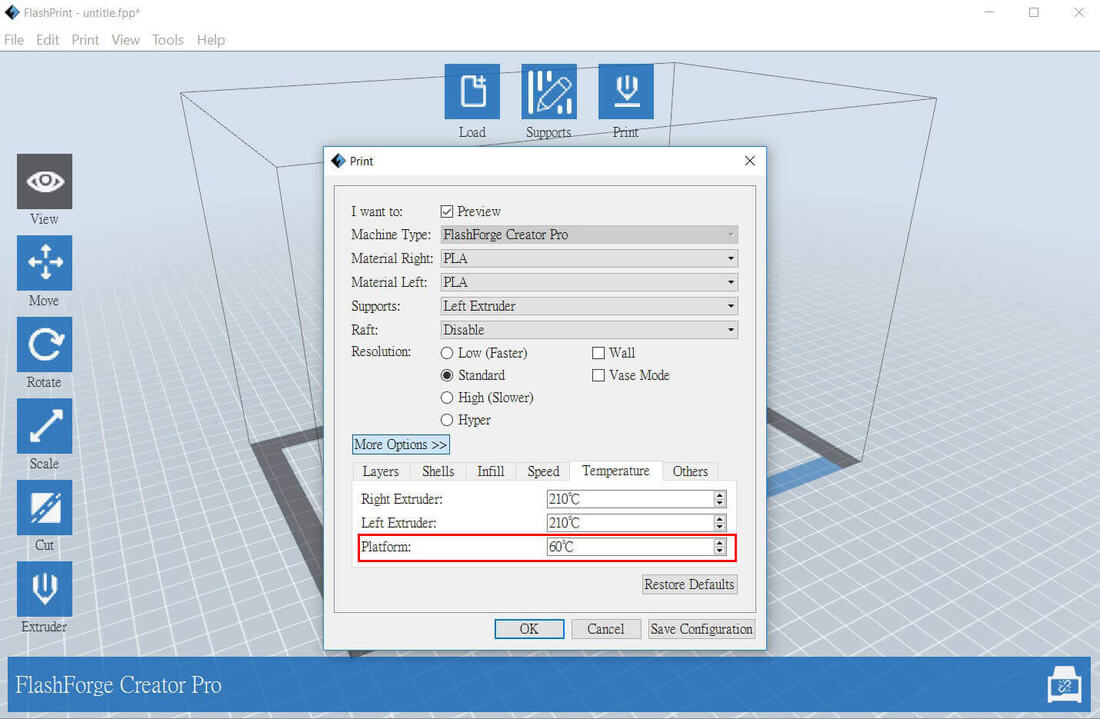
Previously we introduced the difference between treelike support and linear support in the 3D slicing software. Today we are going to talk about the detailed settings of treelike support. 
​

There are several settings available for Treelike support in the Flashforge's 3D slicing software Flashprint, which are as followings:
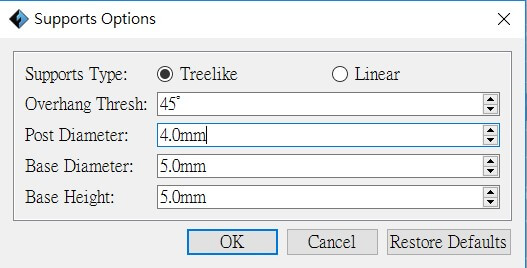
Picture
1. Overhang Thresh
Treelike support will be added when the overhang angle of the 3D model is bigger than the angle you type in the Overhang Thresh field. ​
2. Post Diameter
This is to set the diameter of the treelike support for the 3D model, bigger diameter is better if the treelike support it very long, otherwise it may be broken during the 3D printing process.
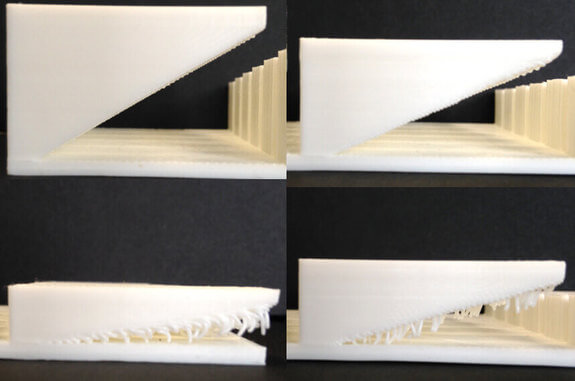
3. Base Diameter
Picture
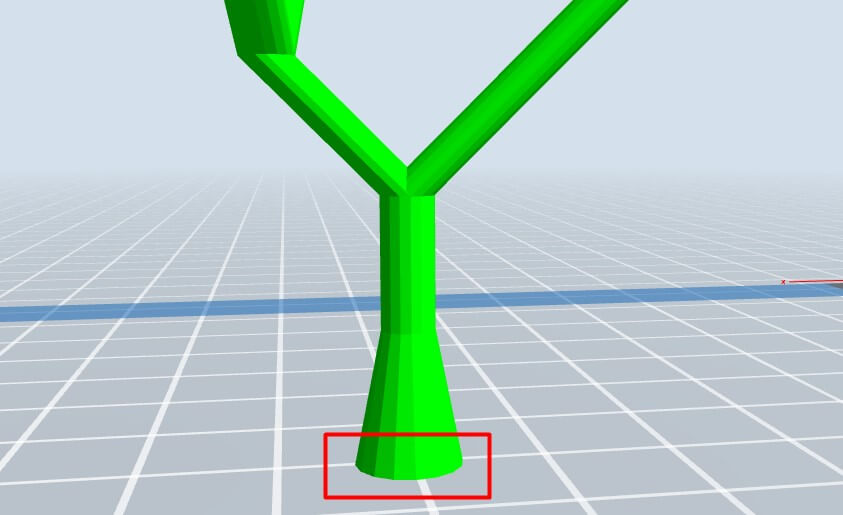
This is the to set the diameter of the bottom part of the treelike support. Sometimes the treelike support may fall down or can not attach to the build plate of the 3D printer firmly because of the small base diameter. Increasing the base diameter can improve the situation when 3D printing.
4. Base Height
Picture
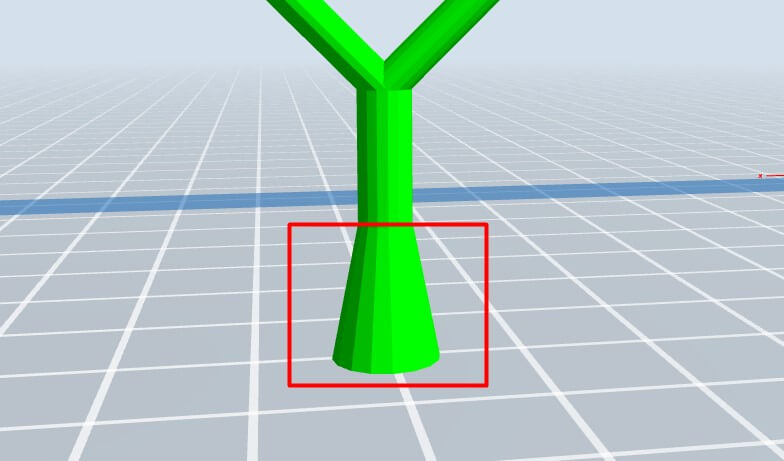
​It refers to the height of the base of the treelike support. If the treelike support is long, longer base height is better as it will provide a stronger structure.
Other article
Picture


​Add/ Remove support material in the 3D slicing software

Gap between 3D printout’s perimeter shells without overlapping?

24/11/2016

 
Picture
image source: 3druck.com
​You may encounter the situation that there is gap between 3D printout’s perimeter shells without overlapping. Today we will talk about what actions we should take to solve this issue.
1.Distance between nozzle and build plate
​If the leveling was not done properly, there is chance that the distance between nozzle and build plate is too far, which could lead to a gap between the 3D printout’s perimeter shells without overlapping. Therefore, user should try to do the leveling again.
2. Perimeter shell overlap rate
​User can try to adjust the 3D model’s perimeter shell overlap rate in the expert mode of the Flashforge's 3d slicing software Flashprint. Normally the overlap rate should be set to be 30%.
Picture

​
​3. First layer height is too low
​If setting the first layer height too low, there could be a gap without overlapping. Try to increase the first layer height and make sure the first layer height is bigger than layer height.
Other Article:
Picture


What is the function of the 3d printer heat bed?  
​

3D Slicing Settings for Big 3D Print

19/11/2016

 
Picture
When doing a big 3D print, there are some 3D slicing settings we need to pay attention. Today we are going to talk about this:
1.3D Printing Speed 
​Print with slower speed would be better if you
 find that the big 3D print can not attach on the build plate firmly. This setting can be set in the 3D slicing software Flashprint as following:
Picture

​2. Temperature of the heat bed
 
if there is a heat bed in your 3D printer, please activate the heating 
function of your heat bed. With heat bed, the warping issues of the big 3D print can be minimized. Beware that the suitable temperature of the heat bed depends on what 3D printing filament you will use. Heat bed temperature in the Flashprint can be set as following:
Picture

​3. Using Raft / Brim
 
Warping issue easily occurs on the bottom part of the big 3D print, so sometimes it is better to add a raft or brim at the bottom of the 3D model, which can increase the 3d print adhesion on the 
build plate. In the Flashprint, raft can be added in the following way:
Picture

4 Infill density
 
​
It is better to have less infill density for the big 3D print, Lower the infill density can lower the warping possibility. It is because the higher infill density means that more contraction force will be created when the 3d print is cooling down. 
Picture
Other Article:
Picture


​What is the function of the 3d printer heat bed?  
 ​

What is the influence of an infill pattern in 3D printing

17/11/2016

 
Picture
Image credit: 3dp0
Generally, when we print a big sized 3d model,  the choice of infill pattern will become more influential than when printing a small sized 3d model. Today we are going to talk more about this.
Hexagon infill pattern is one of the most common infill pattern, and hexagon structure itself is strong. Therefore, using hexagon infill pattern can make the printout stronger, but as the toolpath of the this infill pattern is more complicated, it will take longer time to 3D print the 3D model with hexagon infill pattern.
Another common infill pattern is a line infill pattern. Compared with hexagon infill pattern, line infill pattern is less stronger, but as its toolpath is relatively simple, it takes less time to 3D print with a line infill pattern.
The following is the comparison of using line and hexagon infill patterns in the Flashforge's 3d slicing software Flashprint. As we can see the, using hexagon infill pattern will consume more 3D printing time than using the line infill pattern.
Picture
Picture

Other Article:
Picture


What is top solid layer in the 3D slicing software?


Settings in a 3D slicing software to improve the print bed adhesion

12/11/2016

 
Picture
image credit:robinsonia
Sometimes you may encounter a situation that a 3D model cannot attach on a print bed firmly. Actually there are some settings in a 3D slicing software that can improve the print bed adhesion. ​
First is the printing speed. If we slower down the printing speed, a 3D printout will be able to attach on the print bed more firmly. If you are using Flashprint, you can do this setting as following:
Picture

​Second is to 
increase the temperature of the print bed if your print bed has heating function. Increasing the heat bed temperature can improve the print bed adhesion, and for each printing material, the suitable temperature for the heat bed will be different. If you are using Flashprint, you can adjust the print bed temperature as following
Picture

​Another setting is to adjust the extruder temperature. If we increase the extruder temperature, the printing filament will become more
 liquefied, which can help improve 3D printer's print bed adhesion.
Picture
Increase extruder temperature

Other Article:
Picture


​What is the function of the 3d printer heat bed?  
​

5 Settings relevant to Printing Speed in a 3D Slicing Software 

10/11/2016

 
Picture
Image credit: celtic3d
Previously we introduced 3D printing speed setting, but actually there are several types of 3D printing speeds and today we are going to talk about this.
First is the Exterior Speed which is to set the 3D printing speed of an outermost shell of the 3D model. Generally 3D slicing software will allow users to set the Exterior Speed. If you want to set the Exterior Speed in the Flashforge's Flashprint 3D slicing software, you need to set Flashprint as Expert mode and then do the setting in the Perimeter menu as following:
Picture

Besides Exterior Speed, there is another 3D printing speed for
Top/Bottom Solid Layer called Solid Speed. This setting can also be done in the Infill menu in the Flashprint's Expert Mode as following:
Picture

Th
e 3d printing speed for printing infill (Sparse speed) can also be set in the following menu. In general, the infill printing speed can be set faster than other 3d printing speeds:
Picture

Some 3
d slicing softwares can also allow you to set the 3d printing speed of the support. In Flashprint's expert mode you can set the printing speed of tree-like support and linear support as following:
Picture

Finally,
if you need to print a 3d model with dual materials, you may need to activate the "wall" function. The 3D printing speed of the wall can also be set in Flashprint's Expert mode as following:
Picture

Other Article:
Picture


3D Print Speed Setting and Its influence

What is the difference between ABS and PLA 3D printing settings?

5/11/2016

 
Picture
image credit: 3dfizz
When 3D printing either ABS or PLA, the settings in the 3D slicing software are different. Today we will talk about what settings we need to pay attention by using Flashprint 3D slicing software.
The first thing we need to pay attention is the 3D printing temperature. The ABS printing temperature is around 230-250°C, while PLA 3D printing temperature is around 210-220°C. If you do the settings wrongly such as setting the ABS 3D printing temperature too low, there will be a possibility that the ABS material can not be squeezed out from the nozzle. In the Temperature menu of the Flashprint, user can set the printing temperature by entering extruder temperature. 
Picture
Another thing we need to pay attention is the temperature of the heat bed of the 3D printer. As the contraction rate of ABS and PLA are different, the heat bed temperature for ABS can be adjusted to 110 °C, which can decrease the 3D printout warping problem. For 3D printing PLA,  heat bed temperature can be set to 60 °C. The heat bed temperature can be set in Flashprint as following:
Picture
Lastly, users need to pay attention to the fan setting. Fans should be turned off when 3D printing ABS, while the fans should be switched on when 3D printing PLA, which can help minimise the warping issues as well.
Picture

​Other Article:
Picture


What is the function of the 3d printer heat bed?  
​

3D Printing Settings to Minimise Warping Issue

3/11/2016

 
Picture
Image source:3daftermarket
You may sometimes encounter the warping issue during 3d printing. Today we are going to talk about what settings we should do in the 3D slicing software in order to minimise the warping issue.
If want to minimise the warping problem, we first can set the print speed slower in the 3d slicing software. Slower print speed can help the model to attached on a build platform more firmly, which can help decrease warping issue. In the Flashprint's Speed menu, the print speed can be adjusted as following:
Picture
Also, if your 3D printer is equipped with a heat bed please heat the bed according to what the printing material you will use (PLA generally is 60 °C,and ABS generally is 110°C). Heating the bed can effectively minimise the warping problem. To heat the bed in the 3D slicing software Flashprint, user can adjust it in the Temperature menu as following:
Picture
Activating raft function can also help minimise warping issue:
3D Printing Settings to Minimise Warping Issue -  Flashforge Flashprint
Lastly, too high infill density could cause the warping. If warping happens, try to decrease the infill density. In general, infill density can be set 15%-30%.
Picture
3D Printing Settings to Minimise Warping Issue - Flashforge Flashprint

Other Article:
Picture


What is the support function in the 3D slicing software


    Blog

    Archives

    June 2022
    November 2016
    October 2016
    September 2016
    February 2016
    October 2015
    August 2015
    June 2015

    Categories

    All
    3D Slicing Software Settings

    RSS Feed

Products


Adventurer 3
​Adventurer 4
Creator Pro 2
​Creator 3
Creator 3 Pro
Creator 4​
Guider IIs
Guider3
​Guider 3 Plus
Foto 8.9
Foto 13.3
Hunter

​WaxJet 400

Support

Warranties
Course Booking

Flashforge

Contact Us
​Blog

English  中
 © COPYRIGHT 2022. ALL RIGHTS RESERVED.